Sunday, July 31, 2011

Very Merry Tutorial

Shimmer cardstock is so pretty. I especially love using white shimmer cardstock to make snow scenes. The snowflakes just glisten.


I repurposed a worn out pair of my son's khaki pants for the fabric of my tree. Start by getting the fabric wet, put in a container, add ink and work the color through it. You might want to wear rubber gloves so you don't stain your hands and nails. Let the fabric dry.


Once the fabric is dry rip it into about 1/4" strips.

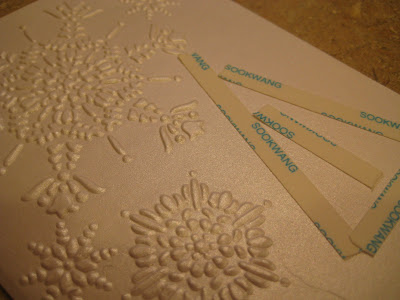
Next take white shimmer cardstock and emboss with Snowflake folder. Place Scor-Tape in basic shape of tree. Don't worry about filling it all in with the tape.


Twist the strips and press down into the Scor-Tape following the basic tree shape.

If there are any pieces of the tree that are not glued down well enough I use Liquid Glass to adhere it to the card. I randomly placed dots of Liquid Glass all over the tree then coated it in glitter. I pressed the glitter down into the Liquid Glass, let it dry then shook off the excess.


Now both the card and tree glisten. To finish off the card I tore strips of paper to make "snow drifts" Next I added glue to the edges and more glitter, popped the "snow drifts" up with foam squares  for them to lay nicely over the bottom of the tree. Last I added a bow and Very Merry tag.


I hope you will take a moment to let me know you stopped by. To quote my son "It makes my heart happy" to read your lovely comments and feedback. Plus I'd love to know if you tried this technique too.
Kindest regards,
Jennifer

Saturday, July 30, 2011

For You


I am loving this color combination of kraft, yellow, green and turquoise. The images are from a shop on Etsy called The House Across the Bay. Its part of a 2" square digital  set called Spring Squares. I was inspired to create this card with a sketch from Mojo Monday.  I first heard of House Across the Bay from the papercraft challenge blog Papercraft Star. I'm adding my card to The Weekend Wrap Up at Tatertots and Jello, Passionately Artistic, Sew Many Cards, Clear It Out, Simon Says Stamp and Show, Lollipop Crafts, Deep Ocean andCraft Us Crazy.

Sunday, July 24, 2011

Tissue Box House Tutorial


Today I thought I would do a tutorial on how to alter a chipboard house to make it hold a box of tissue.


I start with a plain chipboard house. I think most craft stores have them. I get mine at Hobby Lobby. It sells for about $4, unless I can catch it on sale.


First I take a box cutter and score the top of the chimney.


After I score the top I can start to remove the "square".


This is what it looks like after removing the "square".


Now It's time to cut a whole through the roof.


Now you can see through the chimney.


Now a small square box of tissue can fit inside.


Now it's ready to decorate.


It's a bit time coconsuming to make shingles, but I love the texture it gives the house. If you look at some of the other ones I have posted on my blog, you'll see some of them are painted, rectangular shingles or patterned paper. All of the houses that I've made I've sealed them with Mod Podge. It's gives them a nice sheen and strength to the shingles too.


I fill the windows with Liquid Glass which gives them a nice reflection. The window frames are created with square nesting dies, then just adding a small strip of paper for the criss cross. The front door is placed on a tiny hinge so you can open and close it.  For this house I thought it would be fun to add the little white picket fence. The patterned papers and butterflies give it a touch of whimsy.


http://ferrellgraph-x.blogspot.com/2010/10/autumn-tissue-box-house.html

[10.5.2009+046.jpg]

http://ferrellgraph-x.blogspot.com/2009/10/halloween-tissue-house.html

[christmas.tissue.house+001.jpg]

http://ferrellgraph-x.blogspot.com/2009/11/christmas-gingerbread-house.html

[tissue+house+4.jpg]


I hope you liked them and are inspired to make one too. If you check out the links you will see some more photographs of the houses. I'm still working on trying to take better pictures. :)

This is being linked to Cheery Lynn Designs, Embellish Magazine, Tatertots and Jello and
Passionately Artistic.

Friday, July 22, 2011

Hello


The background of this card was made using a faux leather technique. You start by layering the entire card with masking tape, then use several shades of brown inks to age it. I recycled carefully recycled a aluminum can and used a diamond plate embossing folder to create this masculine look. I taped it down with the blue painters masking tape. Next I used alphabet dies to cut "hello" from a sheet of cork. Then I layered it onto some distressed some orange cardstock. The tool stamps came from Technique Tuesday.
This is being linked to the Weekend Wrap Up Party at Tatertots and Jello and to Passionately Artistic.

Love You


It's fun to make round cards. Easier than it looks too! I used some of my favorite retired Stampin' Up! colors - coral cameo, close to cocoa and apricot appeal. I stamped the background paper with the SU! Very Vintage wheel in close to cocoa ink then used a round scalloped die to layer it on the round card base. Next I punched a strip of close to cocoa card stock and added liquid glass to the round area of the scallops. The strip of apricot appeal card stock was embossed in the petals a plenty folder, inked up and highlighted with liquid pearls. I used a die to cut "you" and the leaves on wild wasabi cardstock. I used a punch for the heart and added liquid glass to make it stand out. The roses were made with a die from My Favorite Things and placed in a frame from Stampin' Up! The winter white ribbon is from Zipperstop.
I'm linking this up to Tatertots and Jello and Passionately Artistic.

Make Summer Count

For this summer beach inspired card I used a cork sheet for the sand. I love the texture it gave the card. The papers and lil' crab sticker came from Anna Griffin. The pin wheel is a die from Lil' Inker Designs. This is being linked to Papercraft Star challenge 54 using a  fun party photo and beachy theme. Also to Craft Your Passion challenge to use text.

Saturday, July 16, 2011

Botanical Butterflies


Back in May Rhonna Farrer had a freebie for a Mother's Day on her blog. You'll have to look, they are beautiful! I  used a couple of the elements today to create this card. For the background I used the Very Vintage jumbo wheel on kraft cardstock and crumb cake ink from Stampin' Up!  I finally got the Bow Easy to make pretty double bows with seam binding ribbon. The entire card was sprayed with iridescent gold glimmer mist. I have yet to learn how to photograph that detail. 
I'm linking this to The Kraft Journal Something Borrowed or Something Blue challenge. Also to Moxie Fab World for the Fanatical about Botanical challenge. Craft Your Passion Anything Goes Challenge.And to  Tatertots and Jello Weekend Wrap Up.

Sunday, July 10, 2011

Happiness Is Not A Destination


Don't nautical cards just scream summer. The background wood grain stamp and compass stamps are from Papertrey Ink. The sentiment and explore stamp came from Close to My Heart. Here's the link for a tutorial on how to make the sailor's knot. The globe die was made by quickutz.
I'm entering this into Embellish Magazine nautical color trends challenge. Also to Totally Papercrafts, The Secret Crafter Saturday, Onestop Craft. Tatertots & Jello, Really Reasonable Ribbon and

Inspiration In Action Case Contest

I made another card for the Inspiration In Action Case Contest from Gretchen Barron. I cased a card from the new Stampin' Up! catalog on page 12. I used a few of my retired favorite colors Close to Cocoa, Coral Cameo and Apricot Appeal. I think the retired stamp was from a set called Artisically Asian. I used the Petals A Plenty embossing folder and highlighted the centers with Buttercup Liquid Pearls. I also added Rogue Liquid pearls to the center of the roses. I just love the metal frame. I sprayed the entire card with Iridescent Gold shimmer mist. I think this has a sweet romantic feel.

Saturday, July 9, 2011

Inspiration In Action Case Contest


This Boo card was inspired by a card featured in the new Stampin' Up! catalog on page 25. I used the same stamp from the House of Haunts and I made the pendant banner that says "boo". I changed the background color to purple and used the spider web impression folder to add some texture. Instead of using black ribbon I put in the row of tombstones. There are always so many wonderful creations in each idea book. I hope you like my card I made for the case contest by Gretchen Barron.
Here's her link. I'm posting this over at Tatertots & Jello and Passionately Artistic.
Thanks for looking :)

Wednesday, July 6, 2011

Matchbox Wedding Favors

I just love the way Eileen of TapeSwell photographed the Black Damask wedding favors I made!
And don't you just love the matching tray! It started off as plain unfinished wood. I spray painted it white then added the Black Damask tape. Voila!
 My monogram is a custom stamp from PSA Essentials called Antique Cipher. I have found the best price on them from Expressionary. I see 30% or 40% off offers all the time on their site. I used a die to cut the cardstock then decorated with the tape. Easy Peasy!
If you haven't figured it out by now I really do love TapeSwell!
Please check out their post today and leave a comment.
It just makes my day when I read comments left by visitors! And I know they will love it too!
If you haven't already seen the other wedding crafts I made, please look back at posts in May and June.

Here's the before picture of the tray.

Monday, July 4, 2011

Happy 4th of July


I made this card using the sketch from Mojo Monday. I've had the stamp for so long I have no idea who made it. I used Red Damask decorative tape from Tapeswell on white card stock for the background. The blue strip is actually blue painters tape. I hand cut the red and baby blue strips. Ans finished it off by using a punch from Stampin' Up! for the star.
I'm linking this to Tatertots and Jello!

Dandelion Fireworks


Happy 4th of July!


I had to try this card again with with red and blue craft ink and clear embossing powder. I am so much happier with my second attempt of making dandelions into fireworks. I will still have to buy some red and blue embossing powder.
I'm linking this to The Kraft Journal Patriotic or Americana theme.

Sunday, July 3, 2011

Happy 4th of July


I found these fabulous vintage images over at  Vintage Holiday Crafts.


Celebrate Freedom

Happy 4th of July!

I've had this idea in my head ever since getting this dandelion stamp set from Gina K Designs called Many Wishes. I will definitely be trying it again using red and blue embossing powder too. I hate any weeds in my yard, but I have a hard time resisting to blow and make a wish on a dandelion.
Here's the Link that made me fall in love with this stamp set.
And here's the card that made me need a dandelion stamp set.